Thursday, September 16, 2010

Quick and easy velcro board


For Daniel, using laminated picture cards was part of training to get his own computer communication device (V-max by Dynavox). We still resort to cards for things like flahscards for math or letter recognition. And having an easy to use velcro board is helpful.

This one is cheap and easy to make. I used two thicknesses of foam core -- the stuff used for tri-fold displays. My cheapest source was the Dollar Store. This one is actually an older brother's history display recycled. A hot glue gun makes it easy to secure the two layers together.

Then I covered the board with velcro receptive fabric which I found here: http://www.seattlefabrics.com/

If you don't have access to a specialty fabric store, you could search online, or you can improvise with headliner material -- the stuff used by car restoration buffs to replace the "ceiling" in a car. It's not quite so good, but it does the job.

The velcro receptive fabric is also hot glued down securely.

There you have it -- a light weight, inexpensive, functional surface to attach the PECs symbols or photo cards to.

Wednesday, September 15, 2010

Quitet Busy Book-- toddler or young child


For the kid who's graduated from the "busy bib" stage, but still has motor or vision impairments that get in the way of active exploration, how about a "busy book" like this one?


This bag was purchased at a local crafting store (Michael's). Of course I used a 50% off coupon, which brought the price down to the $10 range. The original intent of these bags I believe is for crafters to store small items such as beads, embroidery threads, and the like.


I like it because it's very easy to quickly change all the contents.

Because Daniel does not have the motor ability to unzip the compartments, the small items are not going to be lost or swallowed. If you have a child who could unzip, you might consider stitching the zipper pulls shut, or opting to make a busy book with clear pages that are actually sewn shut.

We used some of these pages to teach the concepts of counting, color sorting, sorting by category, or even learning initial letter of objects. Plus it was fun to look at during quiet times like church or doctors' waiting rooms.

Tuesday, September 14, 2010

Custom Wheelchair Tray Adaptations for Dynavox


Daniel uses a manual wheelchair with the standard plexi-glass tray. He relies on that tray to support his upper body. It also is a good place to put toys or school materials. We sometimes attach communications symbols to the tray, for quick access. And we adhere hand and arm operated switches to the tray.

But there is no tray on the market that does just what we wanted -- which is to house his augmentative communication device (a specialized computer that is his "voice"). So -- with the expert input of his OT, Trish, and a wonderful volunteer craftsman, Joe, we collaborated on a very custom tray for Daniel.

To accommodate the computer, we had to order a significantly oversized tray. We opted for the slide on style-- tracks mounted on the bottom of the tray slide onto the arm rests of his wheelchair. A strap attached to the tray wraps around the back of the seat to buckle and secure the tray somewhat.

Joe removed the wood trim from the front edge of the tray, and cut out a door the size of the computer. This door is hinged to open up and away from Daniel. Sorry -- the hinges are not on the market. Joe manufactured them himself. He's amazing that way!

Here the lid is closed, allowing Daniel to have a large tray surface. You can see the circle overlay on his computer touch screen -- he slides his hand over the plexiglass to the option he wants, then rests his hands on that "button" for a full second to activate the voice.

Joe fabricated tracks on the underside of the tray which the computer slides into. We strap it to those tracks securely. One very nice feature is that it's possible to plug the power supply and the external switches and earphones in while the computer is in the tracks. All the ports are on the left side of the computer, and the tracks were made to accommodate that.

The weight of the tray, plus the computer, required "kickstands" to support the weight. We've got PVC pipe which can fold down from the tray and rest on the wheelchair footplates. They're the right length to give the tray the perfect angle for viewing the computer.


You might be wondering about the blue mitts on Daniel's hands. We protect his hands from bumps and cuts when he's on the bus by slipping socks over his hands, then securing them with stretchy absorbent wrist bands (used for sports). The black handle Daniel's right hand is resting on is a suction cup mounted hand support make by Rifton. Because it's mounted with suction, we can reposition it depending on Daniel's needs that day. Often he uses it to brace his right arm, allowing him to use his left more accurately.

So -- that's an overview of Daniel's custom tray.

How about you? Have you customized a wheelchair to make it work for your own needs? Share pictures!


Busy Baby Bib -- for infant or toddler with vision and/or mobility impairment

Babies and toddlers are all about exploring and getting into things. When my twins were little, I noticed how much time Andrew, typically developing, spent digging through the toy box or playing with the assorted junk he found around the house. All that exploration built his understanding of the world. He handled textures, learned about weight and shape, examined colors -- all great learning.

Daniel, because of his CP and his CVI (cerebral palsy and cortical vision impairment), was unable to crawl, cruise, or toddle to get into messes. With his high tone (also called spasticity) he was unable to grasp objects. When we tried to wedge a toy into his fist, his startle reflex kicked in, and he'd drop the toy. He was pretty much dependent on us to bring sensory experiences to him -- which we gladly did, but it just wasn't the same as independent exploration.

Enter the busy bibs. . .

These bibs are constructed with basic sewing materials and common household objects. Beginner sewing skills are all that's needed.

You could adapt a commercial bib if you have one on hand. Or you could use a store bought bib as a pattern for your own creation. My bibs used most of two fat quarters of coordinating fabrics, scraps of quilt batting, and a few lengths of elastic, buttons, yarn and ribbon scraps, and a small piece of velcro for the fastening.


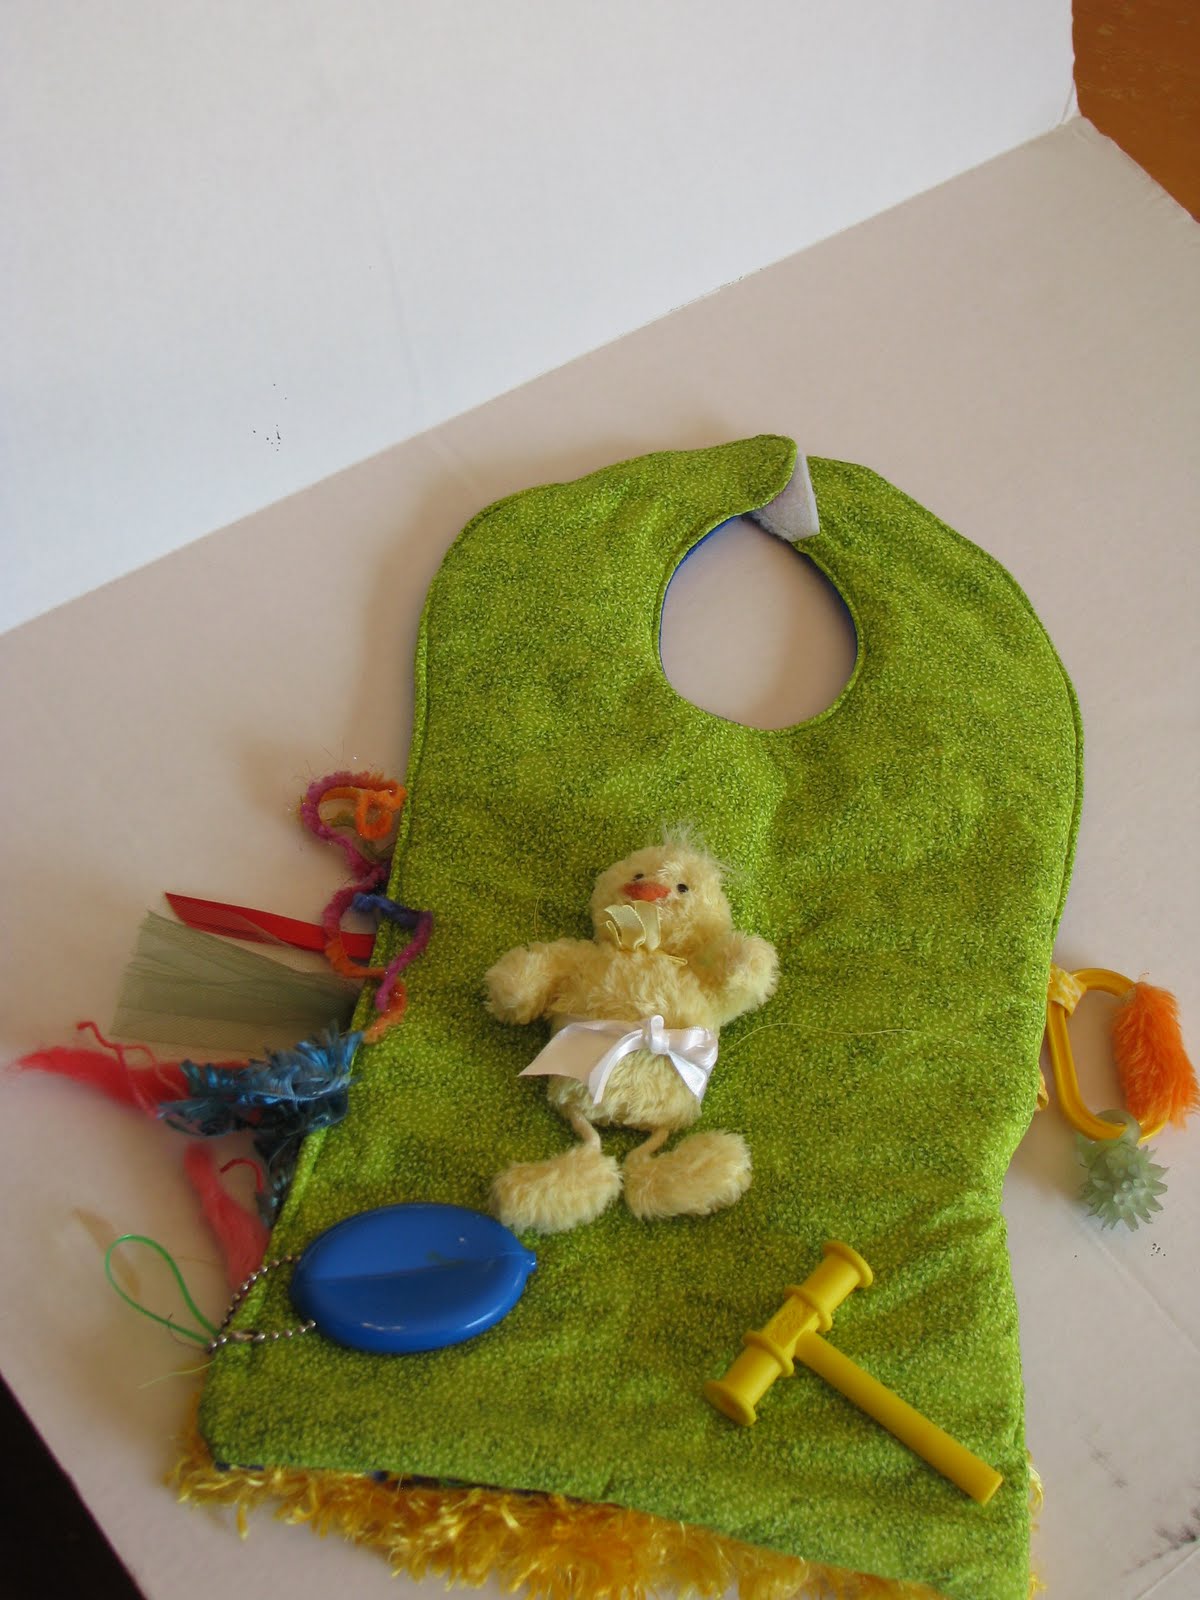
What you're seeing above: The yellow rectangle is a lavender scented bean bag with an elastic loop for easy attachment to bib. Keep in mind that beans can sprout when damp. . . ahem.

The pink heart is a rice and cinnamon scented bag. The blue coin pouch / key chain makes for a fun way to store a couple of small snacks -- cheerios or raisins work.

The assorted yarns, ribbons, and fabric snippets along the right side are similar to "Taggie" blankets often used for infants.

The bottom edge features a tube of minkie fabric in bright yellow. Many children with cortical vision issues favor bright yellow and orange, so we tried to use them often for Daniel.

My kitchen junk drawer was rich pickings for busy bibs -- that orange mesh above? That's from a citrus bag. I put crinkly paper inside. An elastic loop with some plastic beads is sewn securely into the side of the bib.


I made my busy bibs reversible -- the green side features loops for attaching toys. Key chains often made inexpensive, interesting attachments. The yellow "T" is a standard tool for many SLPs working with young children, offering oral exploration and chewing practice. Attaching it to the bib keeps it handy.


Velcro closure works, or you might try using snaps, a button and button hole, or ties.

The white ribbon has a nice satin texture (scraps from a gift packaging.) But it also works well to tie a small stuffed animal to the bib. The yellow chick attached to the bib plays Easter Parade when squeezed.

It's a good idea to make it easy to attach / detach anything that can't go through the washer and dryer easily.

And of course, for safety, you should check for wear and tear, to be sure your child can't remove small items which might be choking hazards.

Hope my busy bibs spark some ideas for your own custom creations. If you make something similar, please share pictures!

Tuesday, August 11, 2009

Wheelchair book bag, easy on and off


This laptop case from Ikea was reasonably priced ($12 when I got it on sale) and the right size for Daniel's speech therapy equipment. The long adjustable shoulder strap can hook over the push bars of the wheelchair, but it just doesn't quite work. We ended up with a tangle of straps and bags, with the feeding pump bag and the push bar extension handles making it quite a chore to get the bag off the wheelchair.

Quick fix. I just added a heavy duty plastic quick buckle to either side of the strap, and created a loop on either side to attach to the push bars. Perfect bag adaption for $2.20 (buckles were $1.10 each at Seattle Fabric) and a little time. It was a bit tricky sewing through multiple layers of webbing strap and bag, but not impossible. Taking the project to a tailor or shoe repair shop might be an option if you don't have sewing machine that's up to heavy duty stitching.

Lift for wheelchair footplates

Daniel has significant leg length discrepancy -- somewhere in the 2 inch range right now. His shoes and braces are custom made to accommodate that -- but who wants to wear shoes and braces ALL the time, specially in summer?

Hence our problem.

The wheelchair footplates are set for his needs when in full shoes and braces. But for those times when he's just wearing sandals, slippers, socks, or barefoot -- his left leg is nowhere near being supported on the footplate, and poor positioning and posture ensue. And with CP, positioning is key.

So this little solution, by no means high-tech or fancy, has saved the day.

What you are seeing:

I used a foam puzzle mat that has seen better days (note evidence of cat sharpening her claws). These can be found at toy stores, Target, or even at big box home improvement stores as floor mats. Cheap source of heavy duty high density foam.


I cut several blocks of foam to fit inside the footplate, and I taped the layers together with packing tape until I got a sufficiently thick piece.

Originally, I just put adhesive backed velcro on the bottom of the foam piece, with the fuzzy velcro side on the footplate. It works, but it's kind of tatty looking. And frequent putting off and on left the velcro worn.


So I sewed a sleeve out of "tough tex" fabric, with box cushion construction, wrapped the foam block in high loft quilt batting, and slipped it inside the black tough tex cover, with velcro to close. I left enough fabric so that I can enlarge the sleeve if he needs a thicker lift in the future. The entire contraption is held onto the footplate with a double sided velcro strap. Easy on, easy off. And doesn't call attention to itself.


And yes, I do know that some wheelchairs have quick adjust footplates, for just such situations as ours. But it's not an available option on this model.

Inspiration

Here's a blog I like -- not because it's special needs related, just because I a) like Ikea and b) like using things for purposes for which they were not originally intended. Great blog to follow to keep you in that inventive mode.

http://ikeahacker.blogspot.com/

And for anyone in Seattle area -- Ikea has a Rummage Sale this Sat, Aug. 15. I expect great things at low prices!